Master Wrist Angles for Better Ball Striking Today
Master Wrist Angles for Better Ball Striking: Lower Your Scores and Improve Consistency
Hi friends and golfers! I'm Coach Erik Schjolberg, owner of EJS Golf at McCormick Ranch Golf Club in Scottsdale, AZ. With over 25 years of experience coaching golfers from PGA Tour pros to passionate amateurs, I'm dedicated to helping every player improve from their very first lesson. My state-of-the-art facility and data-driven approach guarantee results, whether you're seeking in-person Scottsdale golf lessons or online golf lessons. Visit my website, EJS Golf, to learn more about the Science of Better Golf and let's elevate your game together!
Introduction
As a professional golf coach, one of the most critical yet often misunderstood aspects of the swing I see in my students is wrist angles. Many advanced golfers know wrist angles are important, but struggle to truly understand and apply the proper techniques. In this post, I'm going to dive deep into the role of wrist angles throughout the golf swing, from setup to follow-through.
I'll explain key concepts in simple terms and share some practical tips you can use to start improving your wrist angles today. Whether you're struggling with consistency, power, or accuracy, mastering your wrist angles can take your game to the next level. Let's get started!
The Anatomy and Physics of Wrist Angles
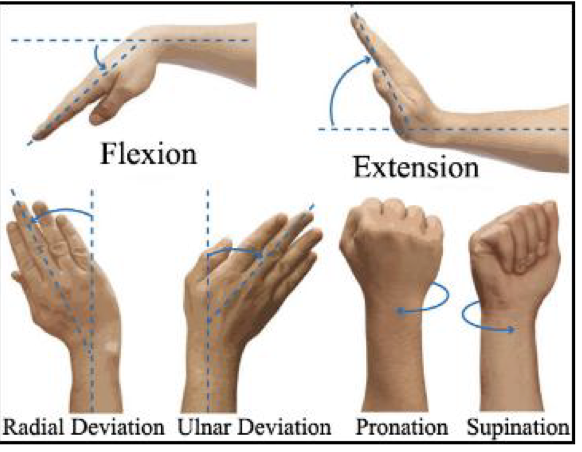
Before we get into the swing itself, it's important to understand some basic anatomy and physics principles at play. Your wrists are incredibly complex joints, capable of multiple types of movement:
Flexion: bending the palm towards the forearm
Extension: raising the back of the hand, bending the wrist backwards
Ulnar deviation: bending the wrist towards the pinky side
Radial deviation: bending the wrist towards the thumb side
Pronation: the inward rotation of the forearm, where the palm of the hand faces down or backward
Supination: the outward rotation of the forearm, causing the palm of the hand to face upward or forward

The two bones of the forearm, the radius and ulna, cross over each other when the palm is rotated down (pronation) and are parallel when the palm faces up (supination). This allows the wrists to rotate and hinge in various ways throughout the swing.
In terms of physics, the wrists are levers that can generate clubhead speed and transfer energy from the body to the club. Proper wrist angles help to create lag, where the clubhead trails behind the hands during the downswing, storing up energy to be released at impact.
With those basics in mind, let's look at the role of wrist angles in each key position of the golf swing.
Setup (Position 1)
At address, aim to have your wrists in a relatively neutral position - not cupped (extended) or bowed (flexed). A neutral wrist angle sets the stage for an on-plane swing and solid contact.
One of the most common setup mistakes I see is a cupped lead wrist (left wrist for right-handed golfers). This tends to open the clubface and can lead to slices and loss of power. Instead, feel like your lead wrist is flat or even slightly bowed. The trail wrist should be bent slightly towards your body.
Takeaway (Position 2)
As you start the takeaway, focus on maintaining the angle between your lead forearm and the club shaft. Many golfers either cup the wrist or roll it too far to the inside, losing that vital angle. A good cue is to keep your lead thumb pointed straight down the shaft as you rotate your arms, shoulders, and chest away from the ball.
Your trail wrist should start hinging upwards as your hands pass your trail thigh. This sets the club working up on the proper swing plane. Avoid the impulse to keep the trail wrist locked - it needs to hinge to store power and maintain the shaft angle.
Backswing (Positions 3-4)
As you continue rotating back, the hinging of your trail wrist becomes more pronounced. This hinge is created by a combination of ulnar deviation and flexion - the hand bends towards the pinky side and the palm as the club points more vertically.
Many golfers either keep the trail wrist too flat or cup it, leading to a laid off position at the top where the club points well left of the target (for right-handers). Instead, feel like you're folding your trail forearm and wrist up towards your head while keeping the lead wrist flat. Roger Federer's backhand is a great visual - a deep, 90° hinge in the trail wrist.
By the top of the backswing (Position 4), your lead wrist should be flat or slightly bowed while your trail wrist is fully hinged. This creates a 90° angle between your lead forearm and the club shaft - the classic "L" position. This stores immense energy in your wrist angles, ready to be unleashed in the downswing.
Downswing (Positions 5-6)
As you start down from the top, the first move is a slight increase in the trail wrist hinge. This keeps the club shaft on plane and behind your hands. From there, the key is to maintain that trail wrist hinge for as long as possible while your arms drop and rotate.
A great training aid for feeling this move is the Gsnap from George Gankas Golf. It straps to your lead forearm and clicks when you achieve the proper trail wrist angle in the downswing. I use it often with my students to ingrain that feel of the clubhead lagging behind.
As you approach impact, your lead wrist should start to flatten and your trail wrist should be flexed and bent towards your target. This compresses the ball and leads to crisp, powerful contact.
Impact (Position 7)
At impact, your lead wrist is flat while your trail wrist is bent towards the target at roughly a 45° angle. Your forearms should be rotated so that your lead palm is facing slightly down towards the ball.
Many amateurs either flip their wrists through impact, losing all the stored power, or keep their lead wrist cupped, leading to inconsistent contact. The key is to maintain that trail wrist hinge as long as you can while rotating your forearms and releasing the club through the ball.
The moment after impact is where the club finally catches up to your hands, passing the shaft angle you set at address. This is the true release, unlocking all the built-up energy in your wrist angles.
Follow-Through (Positions 9-10)
In the follow-through, both wrists continue to rotate and release. Your lead wrist will cup while your trail wrist flattens. This allows the club to swing freely around your body and up to your finish position.
Many golfers tense up post-impact and restrict their wrist movement, leading to abbreviated follow-throughs and a loss of speed. Instead, keep your wrists loose and let them flow naturally through to a full finish. Trust the angles you set earlier in the swing - they'll take care of the rest!
Drills to Improve Your Wrist Angles
Now that you understand the key principles of wrist angles, here are some of my favorite drills to help you ingrain the proper feelings:
1. Gsnap Drill: As mentioned earlier, the Gsnap training aid is fantastic for feeling the correct trail wrist angle in the downswing. Hit short shots focusing on getting that "click" at the right position.
2. Impact Bag Drill: Take your setup with an impact bag just outside your lead foot. Make slow swings, focusing on maintaining your wrist angles as you compress the bag. Feel your lead wrist flat and trail wrist bent at 45° through impact.
3. Pause Drill: Make a swing at 25% speed, pausing for 3 seconds at each key position (takeaway, top of backswing, impact, follow-through). Check your wrist angles at each checkpoint and make corrections.
4. One-Handed Swings: Practice making swings with just your lead hand, feeling your wrist stay flat or slightly bowed throughout. Then do the same with your trail hand, focusing on the hinge and release. Put them together to blend the feelings.
Remember, wrist angles are a small but crucial piece of the overall swing puzzle. They work in harmony with your body rotation, arm movement, and club path to produce powerful, consistent shots. Trust the process and stay patient with your practice - mastering your wrist angles takes time!
Conclusion
There you have it - the complete guide to wrist angles in the golf swing. We covered the key anatomical and physics principles, the role of the wrists in each stage of the swing, and some practical drills to groove the proper feelings.
The wrists are often an overlooked fundamental, but as you can see, they're vital to storing and releasing energy effectively. Proper wrist angles can help you hit the ball farther, straighter, and more consistently - what every golfer wants!
If you're serious about taking your game to the next level, I highly recommend investing some focused practice time into your wrist angles. Use the concepts and drills from this guide and you'll start seeing results on the course.
Hi friends and golfers. My name is Coach Erik Schjolberg, founder of EJS Golf: The Science of Better Golf. With over 20 years of experience in golf instruction, I am dedicated to helping players achieve a powerful and efficient consistent impact leading to lower golf scores. I teach in Scottsdale, AZ, at my academy, EJS Golf, located in the beautiful private oasis area on the grounds of McCormick Ranch Golf Club. Offering both in-person Scottsdale golf lessons and convenient online golf lessons, I strive to make my elite golf instruction accessible to all. Please check out my website and explore more blogs on EJS Golf to learn more about my teaching philosophy and programs. Together, we can unlock your full potential, finally achieving the distance you hope for and/ or scoring you know you can reach.
(480) 861-9370
