Forward Body Dynamics for Clean Golf Impact
The Science of a Perfect Strike: Why Forward Body Movement Is Essential for a Clean Impact
The Science of a Clean Strike: Why Your Body Has to Move Forward by Impact
The Science of Better Golf| by Coach Erik Schjolberg
Golf is physics, not mystery. In over 25 years of coaching — Tour players, college athletes, high-level juniors, and weekend golfers in equal measure — the single pattern I see separate clean ball strikers from chronic fat-and-thin players is what their body does relative to the ball by the time the club arrives. If you are going to strike the ball first and then the turf on every shot off the ground, the low point of your swing arc has to sit in front of the ball, and that only happens when your body has moved forward from where it started at address. This is not a feel or a swing tip. It is the mechanical requirement for ball-first contact, and once you understand why, you stop guessing and start measuring.

I'm Coach Erik Schjolberg, top rated golf coach based in Scottsdale, Arizona, coaching in person at McCormick Ranch Golf Club and online worldwide. In this post I'll break down the mechanism behind the forward move, why the low point lives where it does, what the P6 checkpoint actually tells you, and how pressure, ground reaction forces, and body mass all fit together. I'll give you measured numbers from a real swing as a reference — not as a target you must copy — because every golfer is built differently and every golfer gets a matchup, not a one-size formula.
Why the Low Point Has to Move Forward
Here's the part most amateurs are never told plainly. The low point of your swing arc — the bottom of the circle the club head travels — sits roughly under your lead shoulder. That's a function of geometry: your lead arm and the club form a radius, and the bottom of that radius tracks with the top of it. So if your upper center, your sternum and lead shoulder, stays behind the ball through impact, the low point stays behind the ball too. When that happens, the club is already traveling up by the time it reaches the ball, and your only options are to hit the ground first (fat) or to add loft and flip the hands to catch it clean (thin, weak, inconsistent). Neither is repeatable.
Move your upper center forward, and the whole arc moves with it. Now the low point is in front of the ball, the club is still descending at contact, and you get ball first, then turf — with a divot that starts at the ball and goes forward. That forward-moving low point is what produces compression, forward shaft lean, and a strike that holds up under pressure. This is why I teach the body move first and the hands second: the hands leading the club head is a result of the body being forward, not a thing you manufacture in isolation.

Low point behind the ball produces fat shots and flips; low point forward of the ball produces ball-first contact.
Body Movement by Impact: What Actually Shifts
In a sound strike off the ground, the hips and the sternum have both moved toward the target relative to address by the time the club reaches the ball, while the head stays comparatively stable so the upper-body tilts are preserved. That last point matters: your head is attached to your upper body, so wherever the head goes, the upper center tends to follow. Let the head slide forward excessively and you lose your tilts and your strike location; hang the head back and you drag the low point behind the ball again. The goal is a forward shift of the hips and sternum with the head staying roughly over the ball.
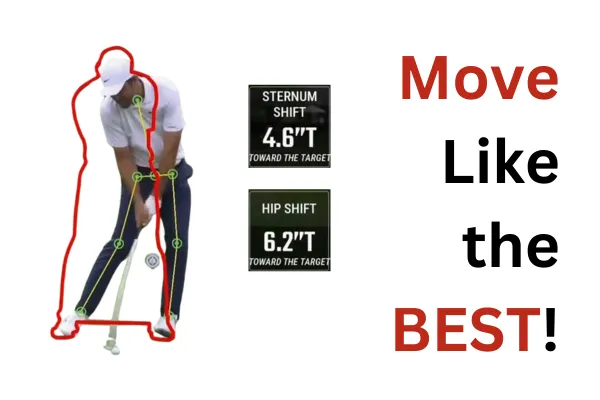
I recently measured a golfer whose move illustrated this well: hips about 6.2 inches forward and sternum about 4.6 inches forward of their address positions at impact, with the head essentially stacked over its starting spot. I want to be precise about what those numbers are and are not. They are a snapshot of one golfer who moved well — a useful reference for what a strong forward shift can look like. They are not a universal benchmark, and you should not chase 6.2 inches because someone on the internet hit a good shot at 6.2 inches. Your numbers depend on your height, your stance width, your stance dynamics, and the club in your hand. We measure your swing and build your matchup. The principle is universal; the specific distances are individual.

Address versus impact: hips and sternum shift forward, head stays over the ball, hands lead the club head into forward shaft lean.
Pressure, Center of Mass, and Ground Reaction Forces — Not the Same Thing
This is where a lot of instruction gets sloppy, so let's be exact. Pressure is the force your feet apply into the ground; we read it on a pressure mat that measures vertical, lateral (toward the target), and horizontal (rotary) ground reaction forces. Center of mass is where your body's actual mass is located in space. These two things do not move at the same time. In a good swing, pressure shifts into the lead foot early — often well before the body's mass has finished traveling forward. You can have a strong lead-foot pressure reading while your center of mass is still catching up. HackMotion and the pressure mat let me separate these so we're coaching the right variable instead of lumping “weight transfer” into one vague feeling.
That distinction matters because ground reaction forces are a consequence of how you move, not the lone driver of the swing. Pushing into the ground in the right sequence helps you produce and time speed, but you don't create a good swing by simply shoving harder into the mat. The forces show up correctly when the movement is correct. So when your hips and sternum aren't getting forward enough by impact, the pressure and force data will show the timing problem — and that's diagnostic gold — but the fix lives in the movement pattern, not in trying to “make more force.”

Pressure into the lead foot leads; center of mass follows. The two curves separate through the downswing.
Understanding P6 — and What It Really Predicts
P6 is position 6: the moment in the downswing when the club shaft is parallel to the ground. I check it constantly because what you do at P6 heavily influences your impact alignments — but let me correct a common overstatement, including one I've made loosely in the past. P6 does not dictate your shot direction. Impact dictates direction. Start line is governed mostly by where the club face points at impact, and curvature is governed by the relationship between face and path. P6 is a strong leading indicator of where impact is heading, which is exactly why it's worth checking, but it's a checkpoint on the way to impact, not the thing the ball obeys.
From a face-on view at P6, the hands should be ahead of the trail thigh. That forward hand position is your visual confirmation of forward shaft lean and forward pressure. A golfer who casts — who throws the club head out early — shows a gap, with the club head catching up to or passing the hands and the hands stuck back near or behind the trail thigh. From down the line, I look at how the club face relates to the lead-arm and spine angle as a neutral reference, and then I adjust it to the player's matchup. A player building a draw with a stronger grip will often have the toe more downward (face more closed to that reference) at P6, because a stronger grip delivering a more closed face needs a release that matches it. A player working a fade with a weaker grip will look different. The point isn't a single correct P6 face — it's that the grip, the wrist conditions, and the release have to agree with each other.

P6, down the line: shaft parallel to the ground, hands ahead of the trail thigh, club face related to the back angle as a reference.
One more correction worth stating: I used to say an open club face “causes” the body to stall. More accurately, it's a compensation. When a player senses the face is open, they'll often subconsciously hang back and flip to square it, which stalls the forward move. The open face doesn't mechanically freeze the body — the brain does, trying to save the shot. Fix the face-and-release matchup and the reason to stall disappears.
A Note on the Driver
Everything above is the rule for shots off the ground, where you want the low point in front of the ball. The teed driver is the exception. With the driver you want to catch the ball on the way up, so the low point sits behind the ball and the body presentation at impact looks different — more tilt away from the target, less shaft lean, an ascending strike. Don't take the iron pattern and force it onto your driver. Different goal, different matchup.
Drills That Improve Your Strike Today
I reject the idea that you have to get worse before you get better. That line is an excuse for vague coaching. Every drill below should improve your strike location or contact quality the same session you do it, because each one constrains you into the correct pattern rather than asking you to try harder.
Drill 1: The Forward-Shift Half Swing
Make waist-high to waist-high swings and consciously get your hips and sternum moving toward the target as the club comes down, keeping your head roughly over the ball. Use a pressure mat or a mirror if you have one, and record it. The constraint: make a divot that starts in front of a tee pushed into the ground at ball position. If your divot starts behind the tee, your low point is still back. Chasing the forward divot forces the body forward without you having to think about body parts.
Drill 2: Hands-Ahead-of-Trail-Thigh Check at P6
In front of a mirror or on video, move slowly to P4 (top), then sequence down: pressure into the lead foot first, then the lead hip clearing back as the chest grabs on and rotates, then the arms and club — each segment moving faster than the one before. Pause at P6 and check two things: hands ahead of the trail thigh, and the club face related to your back angle for your intended shot. The constraint is the visual checkpoint itself; you either see the hands ahead or you don't, and that immediate feedback retrains the cast.
Drill 3: The Impact-Tape Strike Audit
Put impact tape or foot spray on the face. Hit half and three-quarter shots focused only on ball-first contact with the hands leading. After each one, read the strike location and the divot. Pair it with TrackMan or your launch monitor if you have access so you can tie strike location to launch, spin, and low-point data. The constraint is the evidence: you adjust based on where the ball actually contacted the face, not on what the swing felt like.
How the Forward Move Changes Your Ball Flight
When your body gets forward correctly and the low point moves in front of the ball, the practical results show up fast and you can feel them. Your contact becomes ball-first and the strike moves toward the center of the face, which immediately tightens your dispersion. Compression improves because you're delivering the club with forward shaft lean instead of adding loft and flipping, so the ball comes off with a more penetrating flight and more efficient speed. And because you're no longer making last-instant saves with your hands, the start line and curvature become more predictable — you can actually work the ball on purpose instead of hoping. I won't put a fabricated percentage on any of that, because the honest answer is that the magnitude depends on the golfer; what I will tell you is that cleaner low-point control is the highest-leverage change most amateurs can make, and you'll see it on the very first session.
How to Work With Me
I don't guess — I measure, then I change what matters most: impact. My setup includes TrackMan 4, HackMotion wrist sensors, a pressure mat reading ground reaction forces, 3D analysis, and high-speed video, all in service of building predictable ball strikers. If you want to work on your low point and your forward move in person, book Scottsdale golf lessons at McCormick Ranch. If you're anywhere else in the world, I coach golfers through online golf lessons. You can also grab my free drills guide at EJSGolf.com/my-drills, read more on the blog, or learn more about me. When you're ready, book now or reach me through my contact form.
Frequently Asked Questions
1. How far should my hips move forward at impact?
There is no single correct number. The 6.2 inches I measured on one golfer is a reference for what a strong forward shift can look like, not a target to copy. Your distance depends on your height, stance width, and the club you're hitting. What matters is the principle: your hips and sternum move toward the target enough to put the low point in front of the ball, and we measure your individual numbers to dial in your matchup.
2. Won't moving forward make me sway off the ball and lose contact?
Sway and a forward shift are not the same thing. A sway is excessive lateral movement that destroys your tilts and moves your head off the ball. The forward move I'm describing keeps the head relatively stable over the ball while the hips and sternum shift toward the target. If you feel like you're sliding and losing strike, the head has gone with you — keep the head quiet and let the lower body and chest do the moving.
3. Is forward shaft lean something I should try to create with my hands?
No. Forward shaft lean is a result of your body getting forward and the low point moving ahead of the ball, not something you manufacture by shoving your hands forward. If you try to add lean with the hands while your body hangs back, you'll typically create a steep, low-launching strike or start flipping to compensate. Get the body forward and the shaft lean shows up on its own.
4. Does this forward-move rule apply to my driver too?
No, and this trips up a lot of golfers. The forward low point applies to shots off the ground where you want ball-first contact. With a teed driver you want to hit up on the ball, so the low point sits behind the ball and you'll have more tilt away from the target with less shaft lean. Use the forward pattern for irons and wedges off the turf, and a different presentation for the driver.
5. What's the fastest way to know if my low point is in the right place?
Push a tee into the turf at your ball position and watch where your divot starts. If the divot begins in front of the tee, your low point is forward and you're striking ball-first. If it begins behind the tee, your low point is still back and you'll fight fat and thin shots. It's the simplest, most honest piece of feedback you can give yourself, and you don't need any technology to read it.
Coach Erik Schjolberg
— The Science of Better Golf
Data Speaks: The Numbers Behind the Move
In one of our recent analyses, I examined a picture of a golfer whose mechanics exemplified this principle perfectly. At impact, the golfer’s hips had moved 6.2 inches forward, and the sternum had advanced 4.6 inches forward from the initial address. Notably, the golfer’s head remained in its original position, ensuring that the body’s forward motion was isolated to the key elements—hips and sternum—without any unnecessary lateral or vertical movement. These specific measurements are not arbitrary; they are the product of my research and practical experience. These serve as benchmarks for what an effective forward weight transfer could look like for some or be a starting point to work from. We have to understand that every person is different and that we are going to adapt to each individual golfer.
Understanding P6 in the Golf Swing
P6 is for "position" 6, the moment in the golf swing when the club is parallel to the ground on the downswing. This position is critical because it’s where the club face and body alignment dictate the quality and direction of your shot for the most part. At P6, my objective is to ensure that the club face mirrors the angle of your back. As a golf coach I work from there. But if we are building a draw golfer, you bet I want to have the toe down on the club face, matching their back angle. This alignment is essential for clean, ball-first contact with no manipulation required.
From a face-on view at P6, your hands should be positioned ahead of your trail thigh. This forward placement of the hands not only confirms proper weight transfer but also sets the foundation for a stable and powerful strike. Someone who casts the golf club would see a gap between the trail thigh and the hands at p6. The club face, at this moment, should align with your back’s angle. This is very dependent on other factors but this is a good starting point.
For golfers seeking a draw, the club head should appear slightly behind your hands when viewed from down the line. This subtle positioning creates a closed club face relative to your target line, encouraging a right-to-left ball flight (for right-handers). On the other hand, if you’re working to hit a fade, the club head should be slightly outside your hands at P6. This adjustment promotes an open club face relative to your swing path, resulting in a left-to-right ball flight.
By precisely controlling the position of the club head relative to your hands and ensuring your hands are ahead of your trail thigh, you’re setting up your swing for maximum efficiency and consistency. This fine-tuning at P6 is critical for achieving a repeatable, powerful strike that makes a significant difference in your game.
The Role of Ground Reaction Forces (GRF) in a Modern Golf Swing
One of the most exciting developments in golf instruction over the past decade has been the ability to measure and analyze Ground Reaction Forces (GRF). GRF analysis provides a window into the mechanics of your swing by measuring the forces exerted by your body against the ground. These measurements allow us to determine whether your weight transfer and body movements are optimally timed
By using GRF data, we can pinpoint exactly when and how your pressure is moving during the swing. For example, if your hips and sternum are not moving forward enough by impact, the GRF data will show an imbalance that can lead to a lack of power and control. With the use of technology like Motion 2 Coach, I can provide detailed feedback that helps you make precise adjustments—ensuring that you strike the ball cleanly every time. That should be the goal of any golfer. I keep arguing that even the beginning golfer can, if taught properly, fi
Studies have shown that even a 5-10% improvement in the efficiency of weight transfer can result in significant gains in ball speed and accuracy. This is why I emphasize the importance of a proper forward move. In our training sessions at the EJS Golf Academy, we utilize a combination of visual feedback and quantitative data to guide each golfer’s progress. For instance, when a golfer moves their hips 6.2 inches forward at impact, we know they are in the optimal range to achieve maximum power and consistent contact.
Practical Applications: Drills and Exercises
I often recommend practicing with simple drills that emphasize moving the hips and sternum forward. One such drill is to take half swings while consciously focusing on shifting your weight forward, ensuring that your head remains stable. This drill, when performed for just 15 minutes per day, can accelerate your muscle memory and ingrain the correct motion into your swing. These drills are a staple in my coaching philosophy, and I have seen them help golfers of all levels refine their technique.

A Real-World Example: Analyzing the Impact Position
Let’s revisit the picture that sparked this discussion. The golfer in the image exhibits textbook forward movement, with the hips positioned 6.2 inches forward and the sternum 4.6 inches forward at impact. What does this mean for the shot?
The Impact Position: What It Tells Us
Hips 6.2 inches forward: This forward move is critical for initiating a dynamic weight transfer. It means that the golfer’s body is actively engaging in the shot, ensuring that the hands are leading the club head into the ball with maximum momentum.
Sternum 4.6 inches forward: The forward movement of the sternum complements the hip move, aligning the torso correctly to support a stable and powerful strike.
Head staying in place: By keeping the head still, the golfer maintained their tilts. We want to remember that our head is attached to our upper body so what we do with that the head will do. Get the left shoulder down and pointing near the golf ball at P4.
What Can We Learn?
From this example, it’s clear that proper forward movement is not about moving every part of your body indiscriminately; it’s about strategic, measured shifts that ensure the club makes contact with the ball first. The careful coordination of these movements leads to a cleaner strike, better control over the shot, and ultimately, improved performance on the course.
The Role of Club Face Positioning
At the same time, the club face must be in the right position at P6. I always advise my students: “Make sure your club face is in a good position at P6.” An open club face might inadvertently cause your body to stall its forward motion, resulting in a less-than-optimal strike. Therefore, matching the leading edge of your club face to the angle of your back is not just a suggestion—it’s a necessity for consistent ball-first contact. Remember that golfers are different with match-ups. You may have to adjust how much your toe of the club is down. The point is that the club face is closing nicely by this point.
Training Routine
At EJS Golf, we are always on the cutting edge of golf instruction, integrating the latest biomechanical research and technology into our training methods. Here’s how I incorporate these principles into a daily practice routine that guarantees improvement from day one.
Daily Drills for Improved Weight Transfer
Consistency is the hallmark of progress in golf. I recommend that all my students spend at least 15 minutes per day focusing solely on the elements that contribute to forward body movement and club face alignment. Some effective drills include:
Mirror Work: Stand in front of a mirror and practice your swing, concentrating on moving your hips and sternum forward while keeping your head steady. This helps build awareness and correct any flaws in your posture.
Slow-Motion Swings: Perform slow-motion swings to focus on every element of the forward shift. This allows you to isolate and understand the mechanics behind each movement.
Step Drills: Learn to separate your lower and upper body through these drills. There are many different combinations of steps that can be used. To watch these step drills and others go to my YouTube page.
The Benefits of a Data-Driven Approach
In today’s world, relying solely on “feel” is no longer a rational approach when we have the data and science behind it. . Data-driven feedback is key to unlocking your full potential. By measuring your GRF, monitoring your club face position at P6, and analyzing your swing in slow motion, you can make precise adjustments that lead to consistent improvements. This scientific approach is what sets EJS Golf apart from other instruction centers in Scottsdale and beyond. I don't guess. I measure and make changes that are meant to improve what matters the most, impact.
For those looking for Scottsdale golf lessons or online golf lessons click on the appropriate link. If you want you can reach me through my contact form.and I will reach out to you.
Professional Impact

The Role of Technology in Modern Golf Instruction
Technology has revolutionized the way we approach golf instruction. Devices such as the Trackman 4 Launch Monitor provide real-time data on your ball speed, launch angle, and spin rate. This information is invaluable in understanding how your forward body movement contributes to a clean strike. By comparing your numbers against industry benchmarks, we can identify areas that need improvement and track your progress over time.
GRF analysis is another breakthrough that has enabled us to quantify the efficiency of your weight transfer, pressure. When you perform a swing, the forces exerted against the ground tell us exactly how much power is being generated. Studies have indicated that optimizing these forces—even by as little as 5-10%—can translate into a noticeable increase in ball speed and distance. With my guidance and the state-of-the-art tools at EJS Golf, you can harness this technology to refine your swing and achieve consistent ball-first contact.
Whether you’re taking Scottsdale golf lessons or golf lessons online, incorporating these technologies into your practice sessions is essential. I encourage all my students to embrace a data-driven approach. With platforms like EJS Golf and our in-depth blog at EJS Golf Blog, you’ll find a wealth of resources that explain how these technologies work and how they can benefit your game. Check me out on Swingyard and read about new technology, reviews and mrore.
Practical Tips and Drills to Master the Forward Move
As someone who has dedicated decades to perfecting the golf swing, I know that the devil is in the details. Here are some practical tips and drills that I use with my students to ensure they achieve the correct forward movement and club face alignment:
Drill 1: The Dynamic Weight Transfer Drill
Objective:
Develop a keen sense of forward weight shift to ensure your hips and sternum move into position by impact.
Setup:
Use alignment rods or clubs on the ground to mark your starting and target positions.
Set up a mirror or, if available, a pressure mat to track your pressure shift.
Execution:
Begin at your address position and make a series of half swings.
Focus on consciously shifting your weight forward so that, by impact, your hips and sternum have advanced (ideally targeting the benchmark of approximately 6.2 inches for the hips and 4.6 inches for the sternum).
Use the mirror or pressure mat feedback to gauge whether you’re achieving a dynamic and measurable forward move. We also need to record and analyze these.
Benefits:
This drill reinforces the importance of a dynamic forward movement, minimizing the risk of fat or thin shots by ensuring that energy is transferred efficiently from your body to the club.
Drill 2: The P6 Mirror Feedback Drill
Objective:
Perfect your P6 alignments by ensuring that your club face mirrors your back angle, with your hands positioned ahead of your trail thigh.
Setup:
Stand in front of a full-length mirror.
Get into your perfect setup posture.
Execution:
Take your address position and perform slow, controlled movement that takes the club to P4 and pause. Now move towards P6 by getting pressure left with a lateral slide, followed by pushing through your thigh from the ground to kick your lead hip back with the chest grabbing on and rotating followed by the arms and club and in each exchange the new segment moved faster than the prior. This all leading to the P6 position (when the club is parallel to the ground) and we can check our alignments.
Check the mirror to verify that your hands are positioned ahead of your trail thigh.
Ensure that the club face is mirroring your back angle:
For a draw, the club head should appear slightly behind your hands when viewed from a down-the-line perspective.
For a fade, the club head should be slightly outside (ahead of) your hands.
Record your swing with your smartphone in slow motion if additional review is needed.
Benefits:
This drill provides immediate visual feedback, allowing you to fine-tune your P6 positioning. Consistent practice will help engrain the correct hand and club face alignment for the desired shot shape.
Drill 3: The Impact Alignment Drill
Objective:
Establish a consistent impact position that couples forward weight transfer with ideal P6 mechanics.
Setup:
Visit your driving range and use impact tape on your club face or an impact sticker system.
Optionally, set up a launch monitor to capture data on club head position and hand placement.
Execution:
Focus on making half or full swings that emphasize keeping your hands ahead of your trail thigh and maintaining the correct club face alignment at P6.
After each swing, immediately examine the impact tape to see where the ball contacted the club.
Adjust your stance, weight shift, or club face angle based on your feedback to ensure you’re striking the ball cleanly.
Repeat the process for a series of swings, continuously monitoring your impact marks and, if available, your launch monitor data.
Benefits:
This drill bridges the gap between practice and performance. By correlating visual impact feedback with data-driven insights, you’ll develop the consistency needed for cleaner, more powerful strikes on the course.
How Forward Movement Impacts Your Overall Game
Consistency and Accuracy
When your body moves correctly by impact, your shots become more consistent. You’ll notice that your ball flight stabilizes, and your accuracy improves significantly. The science is clear: a proper weight transfer leads to cleaner, more controlled contact, reducing the likelihood of fat or thin shots. In fact, data from our sessions shows that golfers who master the forward shift see a reduction in mishits by as much as 30-40%.
Increased Distance and Ball Speed
Optimizing forward body movement isn’t just about consistency; it’s also about maximizing power. The effective transfer of energy from the ground up, captured through GRF analysis, can lead to an increase in ball speed. Many of my students experience ball speed improvements in the 8-12% range, which can translate into significant distance gains on the course.
Building Confidence Through Mechanics
There’s a psychological benefit as well. When you know that your swing mechanics are backed by data and expert analysis, your confidence grows. This increased confidence on the course can lead to better decision-making and a more positive overall experience. As Scottsdale’s best golf coach and the best golf instructor AZ, I take pride in not only teaching the mechanics but also instilling the confidence necessary for success.
Embracing a Data-Driven Philosophy at EJS Golf Academy
At EJS Golf, our philosophy is simple: every golfer can improve from day one when guided by expert feedback and cutting-edge technology. The focus on forward body movement and club face positioning is just one example of how a seemingly small adjustment can yield tremendous benefits.
The EJS Golf Difference
Technology Integration: We use tools like Trackman 4 Launch Monitor, GRF Analysis, and 3D video to provide real-time feedback.
Expert Instruction: With over 25 years of experience, I have refined my approach to emphasize measurable improvements in your swing.
Customized Drills: Every golfer is different. I tailor drills and practice routines to your specific needs, ensuring that you achieve the right forward shift and club face alignment for your body type and swing style.
Consistent Results: My goal is for every golfer to notice an immediate improvement—often from the very first lesson—by incorporating these principles into their training.
Why Every Golfer Needs to Master the Forward Move
If you’re serious about improving your game, mastering the forward move is non-negotiable. Whether you’re a weekend warrior or an aspiring professional, the ability to consistently strike the ball before the ground can be the difference between an average round and a truly exceptional performance. Here’s why:
Enhanced Impact Consistency: When your body moves correctly, you’re less likely to hit fat or thin shots. Clean, ball-first contact becomes the norm rather than the exception.
Improved Energy Transfer: By ensuring that your hips and sternum are in the optimal position, you maximize the energy transfer from your swing. This results in increased ball speed and greater distance.
Reduced Compensation: A common pitfall among amateurs is overcompensating for an open club face by stalling their forward movement. When you focus on aligning the leading edge of your club face with the angle of your back, you eliminate the need for compensatory movements that can lead to inconsistency.
Biomechanical Efficiency: The human body is a marvel of engineering, and every movement in your golf swing should be efficient. The precise numbers—6.2 inches for the hips and 4.6 inches for the sternum—are not arbitrary; they are the result of years of biomechanical research and practical application. Embracing these numbers means you are on the path to a more powerful and repeatable swing.
Final Thoughts: Taking Your Game to the Next Level
As I reflect on decades of coaching experience, one thing remains abundantly clear: the smallest adjustments can yield the biggest improvements. By focusing on the forward body movement and ensuring that your club face is in the optimal position at P6, you set the foundation for a better, more consistent golf swing. A 15-minute focused practice session every day, combined with the latest technology and expert coaching, can dramatically improve your performance on the course.
Find out about working with me by following these links: Scottsdale golf lessons or online golf lessons.
Building a Legacy of Excellence
At EJS Golf, our mission is not just to teach you how to swing better; it’s to build a legacy of excellence. Our commitment to integrating advanced analytics, personalized coaching, and data-driven feedback means that you’re not just learning a sport—you’re mastering a science. And in a game where precision is everything, there is no substitute for science.
I take immense pride in being recognized as Scottsdale’s best golf coach and the best golf instructor AZ, and I continuously strive to help my students achieve excellence on and off the course. Whether you’re a seasoned golfer or just starting out, the journey to improvement begins with a single step—a forward move at impact.
Embracing the Future of Golf Instruction
Looking ahead, the future of golf instruction is bright. With innovations in GRF analysis, advanced launch monitors, and 3D swing analysis, we are only just beginning to tap into the potential of data-driven coaching. At EJS Golf Academy, we are committed to staying at the forefront of these developments, ensuring that every golfer has access to the tools and insights needed to reach their full potential.
I am excited to continue sharing my knowledge and expertise with you through the resources available on ejsgolf.com/blog. Whether you’re here to learn more about forward body movement, proper club face alignment, or the latest in golf swing mechanics, you’ll find a wealth of information designed to help you take your game to new heights.
Emphasizing the Fundamentals for Future Success
Remember, the key to a great golf swing lies in mastering the fundamentals. Focus on moving your hips 6.2 inches and your sternum 4.6 inches forward at impact, while keeping your head still. This combination of precise movement and data-backed feedback is what separates the average golfer from a truly exceptional one.
In Conclusion
I believe every golfer can improve from their very first lesson. The techniques we’ve discussed here are not only backed by decades of coaching experience but also by the latest technological advancements in golf biomechanics. By focusing on a precise forward body move and maintaining the correct club face position at P6, you are setting yourself up for more consistent, powerful, and accurate ball striking.
This blog post is more than just a lesson—it’s an invitation to embrace a data-driven approach to your golf game. Whether you’re looking for golf lessons scottsdale or golf lessons online, my goal is to help you understand the science behind the swing so that you can experience the kind of transformation that has made EJS Golf a leader in the field.
For those interested in a deep dive into golf mechanics and advanced training techniques, I invite you to join me on this journey of continuous improvement. Explore more tips, drills, and in-depth analyses on ejsgolf.com/blog and discover why so many golfers trust my methods to elevate their game.
I’m Coach Erik Schjolberg, and I am committed to ensuring that every golfer, from beginners to seasoned pros, can experience immediate improvements. With the right focus on forward body movement, club face alignment, and the power of GRF analysis, your golf swing will never be the same again.
Remember: it’s not just about swinging harder; it’s about swinging smarter. Let’s embrace the science of the perfect strike and transform your game—one measured inch at a time.
Final Thoughts
Thank you for taking the time to read this in-depth exploration of forward body movement and its impact on your golf game. I encourage you to incorporate these principles into your practice, measure your progress, and embrace the continuous journey of improvement. Together, we can redefine what it means to be a great ball-striker. Always striving to become the best we can be at whatever we try to be great at!
Stay tuned to ejsgolf.com/blog for more expert insights, and remember: every great swing starts with a simple forward move.
This blog post is designed not only to share valuable insights into swing mechanics and biomechanics but also to establish EJS Golf as the authoritative resource on advanced golf instruction. Through a combination of precise data, technology integration, and decades of experience, I aim to help you unlock your full potential on the course. Enjoy the journey to better golf, and I look forward to seeing your progress on the course!
Coach Erik Schjolberg, EJS Golf
The Science of Better Golf
