P1 to P10 Golf Swing Positions: Complete Diagnostic Guide
What Are the P1 to P10 Swing Positions — and How Do You Use Them to Diagnose Every Ball Flight Problem?
Last Updated: July 08, 2026
By Coach Erik Schjolberg, PGA Professional | The Science of Better Golf | McCormick Ranch Golf Club, Scottsdale, Arizona

Coach Erik Schjolberg using high-speed video analysis to diagnose a student's golf swing during a live lesson in Scottsdale Arizona
Most golfers who come to me for Scottsdale golf lessons arrive with a list of symptoms: fat shots, blocks, snap hooks, thin strikes. What they don't have is a cause. And without a cause, every fix is a guess. The P1-to-P10 positional framework is the diagnostic language that eliminates the guessing. It gives every coach and every serious golfer a shared vocabulary for locating exactly where in the swing a fault originates — and, more importantly, exactly where in the kinematic chain the root cause lives. After analyzing thousands of swings on TrackMan and high-speed video at McCormick Ranch Golf Club, I can tell you that the P-system is not academic trivia. It is the fastest path from confusion to clarity.
This post is a complete working guide to all ten positions — what each one governs, what the data tells us when something goes wrong at each checkpoint, and the exact drills from my library that fix the fault at its source, not its symptom.
Key Takeaways
The P1-P10 framework divides the swing into ten measurable checkpoints, each governing specific biomechanical events that directly influence impact.
Every ball flight problem — fat, thin, hook, slice, block, pull — traces back to a measurable deviation at one or more P-positions.
Impact (P7) is the only moment the ball responds to. All diagnostics exist to serve better P7 conditions.
Low point, forward shaft lean, club face angle, and swing path are the four controllable impact variables. The P-positions tell you where each one breaks down.
Fixing a compensation without removing its cause makes the swing worse, not better. The P-system forces you to find the cause.
You do not need a coach in the room to use this framework — high-speed video on your phone, combined with these checkpoints, gives you everything you need for self-diagnosis.
Golfers improve on day one when the diagnosis is correct and the constraint matches the fault.

What Exactly Are the P1 Through P10 Positions?
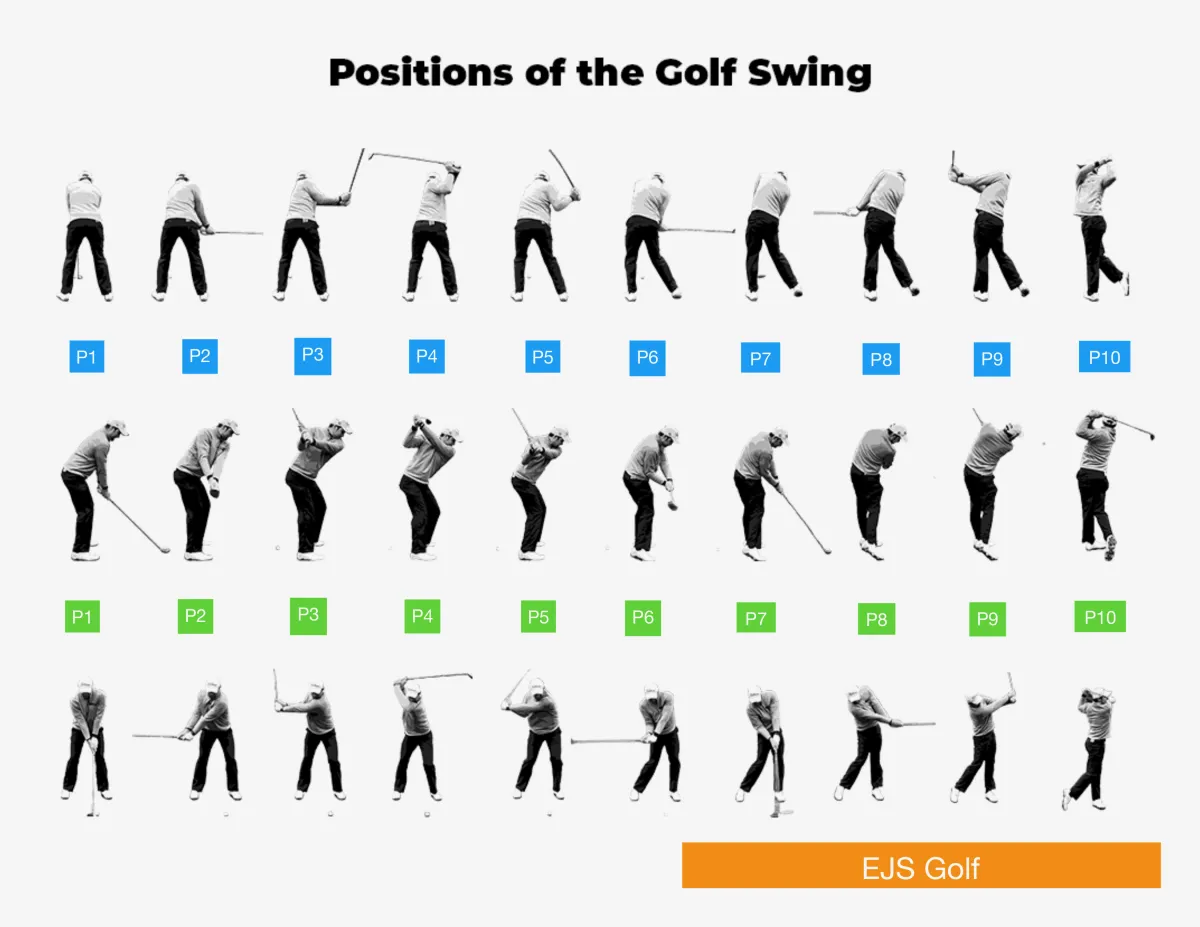
The P-positions are ten standardized checkpoints that divide the full golf swing — from address through finish — into discrete, measurable moments. They were formalized in modern instruction largely through the work of instructors aligned with biomechanics research, and they are now the universal reference language used by TrackMan, Sportsbox AI, and virtually every serious coach working with data.
Here is the complete map:
PositionNameKey EventP1AddressSetup geometry, grip, posture, alignmentP2Club parallel to ground (takeaway)Club head path, face angle, wrist conditionsP3Lead arm parallel to groundShoulder turn initiation, trail elbow positionP4Top of backswingShaft plane, wrist conditions, hip/shoulder separationP5Lead arm parallel to ground (downswing)Transition, shallowing, pressure shift initiationP5.5Trail arm parallel to ground (downswing)Lag maintenance, hand path, shaft plane deliveryP6Impact approach (hands at hip height)Shaft lean, club head speed building, path lock-inP7ImpactLow point, face angle, attack angle, smash factorP8Club parallel to ground (follow-through)Release pattern, face rotation, extensionP9Lead arm parallel to ground (follow-through)Arm structure, body rotation continuationP10FinishBalance, weight distribution, full rotation confirmation
The single most important position is P7. Everything from P1 through P6 is preparation. Everything from P8 through P10 is consequence. But the preparation positions are where the causes live, and the consequence positions are where the evidence shows up. That asymmetry is what makes this framework so powerful diagnostically.
Citation Hook: Research by Dr. Sasho MacKenzie at St. Francis Xavier University has demonstrated that club head speed is primarily determined by the kinematic sequence — the proximal-to-distal transfer of energy from pelvis to torso to lead arm to club — and that deviations in this sequence measurable at P4 and P5 directly reduce peak speed at P7.
Why Does P1 (Address) Determine More Than Most Golfers Realize?
P1 sets every geometric and mechanical condition the swing must work around. A poor setup does not just make the swing harder — it makes certain swing faults structurally inevitable.
The four setup variables I audit at P1 on every student: grip condition, posture angles, alignment, and ball position. Each one creates a downstream matchup problem if it is wrong. A strong grip with a closed club face at P1 and no compensatory changes through impact produces a hook. A weak grip with a steep shoulder tilt produces a slice. These are not swing problems. They are P1 problems.
What Does Grip Condition at P1 Actually Control?
Grip condition at P1 determines the default wrist and club face conditions throughout the entire swing. A strong grip (both hands rotated trail-side) biases the club face toward closed at P7. A weak grip biases it toward open. Neither is universally wrong — but both require matching wrist conditions and release patterns to produce a square face at impact. When the grip does not match the release, the ball flight tells you immediately.
What I see on TrackMan: a student presenting with a 10-12 degree open face at P7 almost always has either a weak grip, excessive extension in the lead wrist through impact, or both. The fix is never "rotate your forearms harder." The fix is matching the grip to the release pattern — or vice versa.
How Does Posture at P1 Affect the Entire Kinematic Chain?
Posture at address determines the available rotation arc. A rounded thoracic spine at P1 restricts shoulder turn, forces a steep backswing plane, and creates an over-the-top transition at P5 that produces out-to-in path and steep angle of attack. I use the T-Spine Foam Rolling drill before every lesson with players who present with a C-posture, because you cannot fix a P4 or P5 fault caused by a mobility restriction with a swing thought. You fix it by restoring the movement capacity first.
The W-Stretches (Scapular Retraction) drill addresses the same problem from a different angle — it reinforces scapular retraction and thoracic extension, which are the physical prerequisites for a full, on-plane backswing.
Citation Hook: TPI research published through the Titleist Performance Institute has identified a statistically significant correlation between limited thoracic spine rotation and an over-the-top transition, with the majority of amateur golfers presenting with measurable T-spine restriction that directly contributes to out-to-in swing direction.
What Happens at P2 and P3 That Most Golfers Miss?
P2 and P3 govern the takeaway and early backswing — and they are the most under-coached positions in recreational golf. By the time most golfers feel something going wrong, they are already at P4 or P5. But the fault started here.

Tiger Woods driver unknown — professional golf swing reference — Coach Erik Schjolberg Golf instruction
What Does the Club Face Condition at P2 Tell You?
At P2 — club parallel to the ground in the takeaway — the club face should be roughly parallel to the lead forearm and spine angle. A face pointing at the sky is closed. A face pointing at the ground is open. Both require compensations later in the swing to square the face at P7.
The most common P2 fault I see is a closed face caused by an over-rotation of the forearms in the takeaway. This leads to a shut face at P4, which then requires either a hold-off release or a re-opening move through impact — both of which destroy consistency. The Toe-Up Swings drill is my first choice here: swinging to P2 with the toe of the club pointing straight up trains the correct face rotation without verbal instruction.
What Should the Lead Arm Position at P3 Look Like?
At P3, the lead arm should be parallel to the ground and the club should be on the correct plane — roughly matching the shaft angle at address when viewed from down-the-line. A club that is too far inside at P3 (flat) produces an in-to-out path and blocked or hooked shots. A club that is too far outside (steep) produces an over-the-top transition and pull/slice misses.
The Split Grip Backswing drill is my primary tool for P3 plane faults. By separating the hands on the grip, the player receives immediate proprioceptive feedback about the arm and club relationship — the body cannot lie when the feedback is that direct.
How Do P4 and P5 Control Your Attack Angle and Swing Path?
P4 (top of backswing) and P5 (lead arm parallel on the downswing) are the two most consequential positions for attack angle, swing path, and the kinematic sequence. Get P4 and P5 right and P7 almost fixes itself.
What Are the Critical Checkpoints at the Top of the Backswing (P4)?
At P4, I audit five things in sequence:
Shaft plane — is the club parallel to the target line and on the correct plane?
Lead wrist condition — flat, cupped (extended), or bowed (flexed)?
Hip-shoulder separation — is there genuine X-factor stretch?
Head position — has it moved laterally or vertically?
Trail elbow — is it in a position that allows shallowing on the downswing?
A cupped lead wrist at P4 is the single most reliable predictor of a flip at P7. The wrist condition at P4 sets the club face condition, and a cupped wrist opens the face. The body then compensates by flipping the hands through impact to square the face — but it does so at the cost of forward shaft lean, low point, and compression. This is the chain: cupped P4 → open face → flip at P7 → low point behind the ball → fat or thin contact.
I use HackMotion wrist sensors to measure lead wrist extension at P4 in real time. When a student sees their 25 degrees of extension on the screen, the problem becomes undeniable. The Waiter's Tray Drill — holding the club in the trail hand and maintaining a flat tray position through the backswing — is the most effective constraint I have found for training a flat or bowed lead wrist at P4.
What Makes P5 the Most Diagnostic Position in the Downswing?
P5 is where the swing either shallows correctly or goes over the top. It is the transition moment, and it is governed entirely by sequencing: lower body must initiate before the upper body unwinds, and the trail elbow must drop toward the trail hip rather than being thrown outward.
When the upper body fires first from P4 to P5, the club goes over the plane, the path goes out-to-in, and the attack angle steepens. This is the over-the-top transition — the most common fault in amateur golf, and the one responsible for the pull-slice that plagues the majority of recreational players.
My first-choice drills for P5 transition faults:
Towel Under Trail Armpit — keeps the trail elbow connected and forces the shallow delivery path
Pitcher's Throw Feel — uses an athletic throwing analogy to trigger the correct lower-body-first sequencing
Airplane Arms — trains the correct arm plane and prevents the shoulder from throwing outward
Pump Drill — allows the player to feel the correct P5 position by pausing mid-downswing before completing the swing
For the over-the-top transition specifically, I also use the Throw the Bag drill, which uses a heavy object to make the correct kinematic sequence feel natural. You cannot throw a bag over the top — the weight forces proximal-to-distal sequencing.
Citation Hook: Dr. Young-Hoo Kwon's research on ground reaction forces in elite golfers demonstrated that peak vertical force occurs just before the transition from backswing to downswing, and that this force spike is a consequence of correct sequencing, not a cause — meaning golfers who try to "push into the ground" without correct P4-P5 mechanics do not replicate elite GRF patterns.
What Does P6 Tell You About Forward Shaft Lean and Compression?
P6 — the position just before impact with the hands at hip height — is the last diagnostic checkpoint before the ball is struck. At P6, the club head is still trailing the hands, the shaft should be leaning forward, and the lower body should already be rotated open relative to the target.
If the hands are not leading the club head at P6, compression at P7 is impossible. A student who flips through impact almost always loses shaft lean between P5 and P6 — the hands stall and the club head overtakes them before impact. This is not a hand problem. It is a pressure shift problem. The hands stall because the lower body stalled first.

Coach Erik Schjolberg coaching a student's golf swing with hands-on instruction at McCormick Ranch Golf Club Scottsdale
Which Drills Fix the Loss of Shaft Lean Between P5 and P6?
For players losing shaft lean in this window, I use:
Force Pedal Setup — trains the pressure shift that drives the hands forward and keeps them ahead of the club head
Impact Bag Push — gives immediate physical feedback on what forward shaft lean feels like at P6/P7
Towel Drag Drill — dragging a towel through the impact zone forces the correct low point and shaft lean relationship
Alignment Stick Grip Extension — a stick in the grip end of the club that catches the lead hip if the shaft flips; immediate external feedback, zero verbal instruction needed
The Belt Buckle Up drill addresses a related problem at P6: early extension, where the hips thrust toward the ball and the upper body rises. This destroys the original posture angles, moves the arc center, and produces both thin strikes and an open face. Belt buckle up is a simple postural cue that keeps the hips rotating rather than thrusting.
For more on how forward shaft lean and low point interact, read my post on forward shaft lean and low point mechanics — it covers the exact shaft conditions I want to see at P6 and P7 in detail.
What Is Actually Happening at P7 (Impact) and Why Is It the Only Position That Matters to the Ball?
P7 is impact. The ball does not know what happened at P1 through P6. It only responds to five conditions present at P7: club face angle, swing path, attack angle, centeredness of contact, and club head speed. Everything before P7 exists to optimize these five variables.
Here is what I want to see at P7 on TrackMan for a mid-handicap player hitting a 7-iron:
Attack angle: -3° to -5°
Dynamic loft: 19-22°
Spin loft: 14-18° (the difference between attack angle and dynamic loft)
Smash factor: 1.38-1.42
Face angle: within 2° of target line
Path: within 3° of face angle (face-to-path within 5° total)
The belt buckle past the inside of the lead ankle at P7 is my primary low point checkpoint. If the sternum and upper-body center have not moved forward of the ball by impact, the arc is bottoming out behind the ball. No amount of hand manipulation fixes that. The fix is always a pressure shift and sequencing correction upstream — at P5 or P6.

Tiger Woods P8 position down-the-line — professional golf swing reference — Coach Erik Schjolberg Golf instruction
Citation Hook: TrackMan data collected across thousands of amateur golfers shows that the average male amateur presents with a low point 1-2 inches behind the ball with an iron, producing a negative attack angle that is too shallow and a dynamic loft that is too high — resulting in high, weak shots with insufficient compression regardless of club head speed.
How Do P8, P9, and P10 Diagnose Release and Rotation Problems?
The follow-through positions are evidence, not goals. What you see at P8, P9, and P10 tells you what happened at P7 — and what caused it upstream.
What Does the Club Face Position at P8 Reveal?
At P8 — club parallel to the ground in the follow-through — the toe of the club should be pointing roughly skyward if the release was correct. A face pointing at the sky (closed) indicates over-rotation. A face pointing at the ground (open) indicates a hold-off or blocked release — which almost always means the face was open at P7 and the player held on to prevent a further miss.
For a face that is open at P8, the Pivot Driven Release drill and the Motorcycle Move are my two primary tools. Both address the root cause — insufficient forearm rotation driven by body rotation — rather than just telling the player to "roll the forearms."
For a face that is closed at P8 with a hook pattern, Hit the Intentional Fade retrains the face-to-path relationship by making the player consciously work the opposite pattern.
What Do P9 and P10 Tell You About Sequencing?
At P9, the lead arm should be parallel to the ground with the club pointing toward the sky and the body fully rotated. A player who stalls at P9 — who cannot complete the rotation — almost always has a sequencing problem that traces back to P5. The lower body decelerated too late or not at all, leaving the upper body with nowhere to go.
At P10 (finish), I want to see full weight on the lead foot, the trail foot on its toe, the belt buckle facing the target, and the club behind the head. A player who finishes on their trail foot is a player who hung back through impact — and their TrackMan data will show it: low point behind the ball, shallow attack angle, high dynamic loft, and a loss of smash factor.
The Stork Drill — finishing the swing balanced on the lead foot only — is a simple constraint that forces the correct weight transfer and gives immediate balance feedback at P10.
How Do You Use the P-System as a Self-Coaching Diagnostic Tool?
You do not need a TrackMan or a coach in the room to use this framework productively. Here is the exact diagnostic process I teach in my online golf lessons:
Film from two angles — face-on and down-the-line — at 240fps if your phone allows it.
Start at P7 and work backward. What is the ball flight telling you? That is your P7 evidence.
Map the P7 fault to a cause position. Fat contact = low point behind ball = check P5/P6 pressure shift. Pull-slice = out-to-in path + open face = check P4 wrist and P5 transition. Block = in-to-out path + open face = check P6 hand path and P7 face condition.
Identify the single highest-leverage position to fix. Not four positions. One.
Select the drill that creates the correct condition at that position — not the drill that feels comfortable.
Measure immediately. Hit five shots with the drill constraint. If the ball flight does not change, the diagnosis was wrong. Go back to step two.
This is the methodology behind every lesson I give at EJS Golf. Diagnosis first. Prescription second. Measurement always.
For a complete breakdown of how fat contact specifically traces through the P-positions, see my post on diagnosing and fixing fat iron shots — it walks through the exact P5-to-P7 chain that causes the most common miss in amateur golf.
You can also watch my breakdown of the P-position diagnostic process on video here — I walk through a real student case from P1 to P10 using Sportsbox AI and TrackMan data simultaneously.
For the complete drill library that supports every position in this framework, download the free drills guide — it includes setup instructions, common errors, and the exact fault categories each drill addresses.
The Complete P1-P10 Fault and Drill Reference
Use this table as your quick-reference diagnostic map. Find the ball flight miss, identify the most likely fault position, and go directly to the drill.
Ball Flight MissPrimary P-Position FaultRoot CausePrimary DrillFat iron shotsP5-P6: low point behind ballHanging back, no pressure shiftForce Pedal Setup, Uphill Lie PracticeThin/topped shotsP6-P7: low point too far forward or arc risingEarly extension, loss of postureTush Line Wall Drill, Belt Buckle UpPull-sliceP5: over-the-top transitionUpper body fires first, steep pathTowel Under Trail Armpit, Pump DrillBlock/pushP6-P7: in-to-out path, open faceTrail side dominance, no rotationPivot Driven Release, Alignment Stick GateHook/snap hookP4: closed face, P7: over-rotationStrong grip + no matchupHit the Intentional Fade, Toe-Up SwingsCasting/flipP5-P6: early release, no shaft leanPressure stall, trial-arm dominantWaiter's Tray Drill, Impact Bag PushHeel strikeP6-P7: path too far in-to-outExcessive trail-side dominanceFoot Spray on Face, Exaggerated Heel HitsToe strikeP6-P7: radius loss, early extensionArc center moving away from ballFoot Spray on Face, Head on Wall DrillLoss of distanceP7: low smash factor, high spin loftMultiple upstream causesPenny Drill, Low Point Gate DrillTempo breakdownP4-P5 transition too fastSequence reversalStep-Swing Drill, Heavy Club / Orange Whip
Citation Hook: HackMotion sensor data from thousands of amateur golfers shows that lead wrist extension (cupping) at P4 averages 28 degrees in players with a handicap above 15, compared to approximately 8 degrees in scratch and professional golfers — a 20-degree difference that directly explains the flip pattern seen at P6-P7 in the majority of recreational players.
For more on how to use technology in your own practice, visit TrackMan's learning resources and the TPI research library at mytpi.com — both offer data-backed frameworks that complement everything in this post.
Frequently Asked Questions
Do I need to fix every P-position to improve my ball striking?
No — and trying to fix every position at once is one of the fastest ways to get worse. The P-system is a diagnostic tool, not a checklist. In my experience working with thousands of golfers at McCormick Ranch Golf Club, fixing the single highest-leverage position — the one that is the root cause rather than a compensation — produces immediate improvement in ball flight. Most players have one primary fault and two or three compensations built around it. Remove the cause, and the compensations often self-correct without direct intervention.
What is the most common P-position fault in amateur golfers?
The most common fault is an over-the-top transition at P5, driven by the upper body firing before the lower body has initiated the downswing. This produces an out-to-in swing path, a steep attack angle, and an open club face at P7 — the classic pull-slice combination. After analyzing thousands of swings on TrackMan and high-speed video, I can tell you that this single fault accounts for the majority of the slices, pulls, and topped shots I see in new students. The root cause is almost always a sequencing problem that begins at P4 — specifically, insufficient hip-shoulder separation at the top that forces the upper body to initiate the downswing.
Can I use the P-system to coach myself without a launch monitor?
Yes, with some limitations. High-speed video from your phone, filmed from face-on and down-the-line at 240fps, gives you enough information to audit P2, P4, P5, P6, P8, and P10 accurately. Ball flight data gives you P7 evidence without a launch monitor — a pull-slice tells you face open, path out-to-in; a block tells you face open, path in-to-out; a hook tells you face closed relative to path. Combine video and ball flight, work backward from P7, and you have a functional self-coaching system. That said, TrackMan and HackMotion remove the guesswork entirely — if you are serious about improvement, the data is irreplaceable.
Why do I keep getting told different things about my swing by different coaches?
Because different coaches are looking at different P-positions and calling the same fault by different names. One coach sees your P8 release and calls it a flip. Another sees your P4 wrist and calls it a cupped position. A third sees your P5 transition and calls it over-the-top. They are all right — but none of them is telling you the cause. The P-system forces every coach to speak the same language and locate the same positions. When a coach tells me a student "flips," my first question is always: what is the P4 wrist condition? Because the flip is never the cause. It is always the consequence of something upstream. You can read more about the complete coaching philosophy behind this approach on the about Coach Erik page.
How long does it take to fix a P-position fault?
The correct answer is: the first session, if the diagnosis is correct and the drill is right. I do not accept "worse before better" as a coaching outcome. That phrase is an excuse for a poor diagnosis or a wrong prescription. What I see consistently in lessons is that when the constraint matches the fault — when the drill creates the physical condition the body needs to experience — the ball flight changes within five to ten swings. The pattern does not become automatic in one session, but the improvement is immediate and measurable. Long-term motor learning requires repetition — typically thousands of quality repetitions — but the direction of change should be positive from day one.
What is the difference between P5 and P5.5, and does it matter?
P5.5 — the trail arm parallel to the ground on the downswing — is where lag, shallowing, and shaft plane delivery are most clearly visible. P5 (lead arm parallel) is slightly earlier and captures the initial transition direction. The distinction matters most for diagnosing casting: a player who loses lag early will show it at P5.5, with the trail arm already straightening and the club head overtaking the hands before P6. The Waiter's Tray Drill and Whoosh Drill both specifically train the P5-to-P5.5 lag maintenance window. For most recreational golfers, auditing P5 and P5.5 together as a single transition window is more practical than treating them as completely separate checkpoints.
How does the P-system connect to TrackMan numbers?
Every TrackMan output at P7 is caused by conditions set at specific P-positions upstream. Attack angle is determined by the pressure shift and arc center movement between P5 and P7. Face angle at impact is determined by wrist conditions set at P4 and maintained or changed through P6. Swing direction (path) is set at P5 and confirmed at P6. Smash factor is the result of centeredness of contact, which is governed by radius control from P3 through P7. When I read a TrackMan report, I am reading a P-position report — the numbers tell me exactly where in the swing to look. The Science of Better Golf blog has multiple posts that map specific TrackMan numbers to specific P-position faults if you want to go deeper on the data side.
Ready to Apply This to Your Own Swing?
The P1-to-P10 framework is only as valuable as what you do with it. Knowing the positions is not the same as knowing how to fix them — and fixing them requires the right drills, applied in the right sequence, measured against real ball flight data.
Start with the free drills guide at EJSGolf.com — it includes every drill referenced in this post, organized by fault category, with setup instructions and the exact P-position each one targets. Download it, pick the fault category that matches your primary miss, and start with one drill. Not four. One.
If you want to go further — if you want the complete system for building ball striking from the ground up — the Ball Striking Machine Blueprint Video Series at thescienceofbettergolf.com/ball-striking-blueprint is the most comprehensive program I have built. It walks through every position in this framework with TrackMan data, HackMotion wrist sensor readings, and constraint-led drills for every fault category. It is the same system I use with tour players and scratch golfers, made accessible for any serious golfer who wants to understand their swing at a mechanical level.
For in-person work, Scottsdale golf lessons at McCormick Ranch Golf Club give you TrackMan 4, HackMotion sensors, Sportsbox AI, and high-speed video — all in one session. For players outside Arizona, online golf lessons use the same diagnostic framework with video submission and data analysis.
The ball does not lie. The P-positions tell you exactly where to look. The drills tell you exactly what to do. Everything else is just noise.
— Coach Erik SchjolbergPGA Professional | The Science of Better Golf | McCormick Ranch Golf Club, Scottsdale, ArizonaEJS Golf


